DIY Concrete Countertops
You might remember the lakehouse that I renovated. While renovating the kitchen, I had to completely redo everything. I decided to make DIY concrete countertops and backsplash to give the kitchen the look that I wanted for it!
This post may contain affiliate links or sponsored content. For full disclosures and practices, please visit my policy page.
Table of Contents
Preparing to Create the DIY Concrete Countertops and Backsplash
I decided I want to cast the countertops from concrete! To begin I am clearing my living room space to use it as an area where we can put down melamine sheets and rails and cast the counters. For this project I am getting a little bit of help from diyconcrete.com. They sent out two of their experts to help me measure the exact dimensions of the counters I want to create. We are also going to be putting down foam rails and modifying the melamine sheet so that the concrete can get poured and solidified into this mold. My countertops will be an inch and a half thing as dictated by the height of the foam rails. I am casting these concrete counters as a stable substrate for me to put another concrete coating over them.


Once our foam molds are created, we are making sure that everything is wiped clean and vacuumed out. This is important to ensure nothing will interfere with the concrete pour. The concrete we are using is a very special formula. It is fortified with three different types of polymers that make it super strong. You can flip them over onto your counter in just 24 hours and they are fully cured in just 7 days!

Pouring the Concrete into the Molds
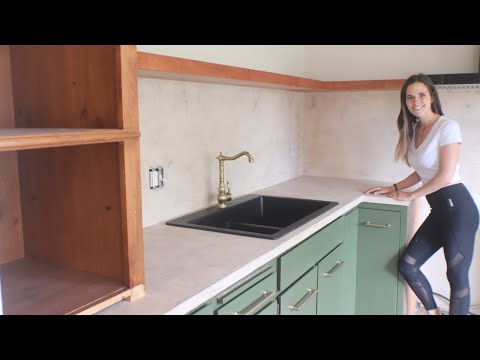
Once the concrete is mixed to the consistency of pancake batter it is time to pour! You want to pour your first layer into your mold and push it up onto the sides of the rails. You do this to prevent any color variation because you will need more than one bucket to fill these molds. Once enough concrete is poured to reach the top of the rails, pat it down into place. The concrete I am using settles beautifully with just a light pat. We created three pieces for my kitchen. The long piece has the cutout for my sink, and two short pieces, one for a single cabinet and the other for the second part of the L-shaped counter.


Releasing the Counters from their Molds
The evening after I poured the concrete it is time to release the counters from their molds and flip them over on to the cabinets. I called in my family to help with this part of the project! First, I have to remove all of the screws that are holding the molds together. Then, I began to take off the foam rails. Because we did not use the tape on the foam rails like you normally would, it made it so the concrete was a little bit difficult to get free from the molds. We tried prying it off with a crowbar, but it just kept breaking into little pieces. It took quite a bit of time for me to get the rails off. It would have been much quicker if I was going for a smooth finish and had used tape.


Once the countertops were finally out of there molds we are able to flip them. Even though the areas around the sink space are very thin, they did not break. We were careful to flip the counter up on its end and carry it like that. This caused there to be way less pressure on the thin pieces. In order to get the short piece of the L-counter to butt up nice and flush next to the long piece of the counter I had to cut through the drywall a bit. This is so there will be a little pocket to slide the DIY concrete countertop into. This gave me wiggle room so we could adjust the piece of counter into place and get the two seams to come up tight. The other short piece of counter is going right on top of the singleton cabinet.


To Be Continued…
If you were just doing concrete countertops, this is the point where you would let your counters cure completely and seal them…but I am not doing that! If you want to read about how I finished this project and went above and beyond, check back for the blog post on DIY Concrete Backsplash!
