DIY Concrete Backsplash
Now that you have seen my DIY concrete countertops, it is time for me to show you how I created the DIY concrete backsplash!
This post may contain affiliate links or sponsored content. For full disclosures and practices, please visit my policy page.
Table of Contents
- Prepping to Create the DIY Concrete Backsplash
- Mixing the Concrete for the New Backsplash
- Trowelling on the First Layer of Concrete
- Adding the Second Layer of Concrete
- Sanding and Sealing the DIY Concrete Backsplash
- Adding the Finishing Touches
Prepping to Create the DIY Concrete Backsplash
I am doing a concrete-look backsplash that flows right onto the counter. I am going to color this to be a soft beige. To start this part of the project, I am taping off my cabinets so I do not ruin their brand new paint job. To prep the sheetrock backsplash to accept the microtech concrete topping, I am putting on a waterproofing membrane. This is going to help with adhesion and prevent the concrete layer from cracking over time. I did two coats of this stuff, I rolled it on with a thick roller.


We are now placing the last slab of concrete countertop into the corner to create the L-shaped countertop. This was not place this with the others because I needed an electrician to come in and wire for my stove. I was unsure how to stabilize the seam where the counter meets the drywall so it would not crack. I decided to run a bead of caulk there in hopes that this would do the trick.


Mixing the Concrete for the New Backsplash
Now that everything is prepped and in place, I am mixing up the micro tech concrete topping. This is mostly water, but I am adding specialty concrete powder to it. This process comes in two different parts for the two different layers that will be applied. The first layer of this is generally darker, I also am coloring mine with sun buff colorant. With the first layer, you are going to want to be very thorough. If you do not mix it enough the colorant can leave streaks.


Trowelling on the First Layer of Concrete
This micro tech topping gets trowelled onto the surfaces. I realized this product is going to dry FAST on the countertops because it absorbs into the concrete. On my backsplash, I knew the product would not soak in as fast as it would on the countertops. Doing the backsplash first is wise because, on a vertical surface, you will drip little bits of the topping and I do not want to mess up the work I will do on the countertop with drips. I enjoyed the process of trowelling this on because it feels artistic.

On the concrete countertops, the product was drying very quickly. This is because the counters are not sealed with anything, so the concrete is just sucking up the micro tech topping. It sticks beautifully!


Adding the Second Layer of Concrete
I let the first layer of concrete dry completely before coming back to add the second layer. The first layer looks very even! I am going across the first layer with a drywall knife to scrape any high points on the concrete. The second layer of concrete mixes up almost exactly the same way as the first, the only difference is that I tend to mix this one slightly thinner. I am spritzing the first layer with water before applying the second layer. This is done so the product does not absorb too quickly and gets chunky and hard to move. The second layer is lighter in color, this is perfect because as you add the product you can see the darker color peak through. This gives the backsplash beautiful movement and a multi-dimensional look!


Sanding and Sealing the DIY Concrete Backsplash
Once the second layer of micro tech topping is dry, I am going in with my random orbital sander. At this point, I liked how it looked, but I was a little sad because there was less color variation than I was hoping for. It looks a little bit flat and dull. Thankfully this is going to change when I seal it. The first step in sealing is making sure your surfaces are extremely clean. I vacuumed all the concrete and used a sticky tack cloth to wipe everything up.

DIYconcrete.com’s countertop sealer is a food-safe polyurethane. This comes in two different parts, A and B. To mix this up you measure three parts of A and two parts of B and mix that with your paddle drill until it is catalyzed. In addition, this product has an induction time where it just needs to sit. Once its rest time is up, the poly sealant gets diluted with seven parts of water for the first coat. We want the first coat to get soaked up by the concrete. Once the product is not soaked up we can dilute it to one part sealant, two parts water. Before applying the diluted sealant, you must spritz down the concrete again. I am sealing the vertical backsplash first. The sealant is being rolled onto the backsplash, but for the counter, I am flooding it. I did three coats of this sealant!


Adding the Finishing Touches
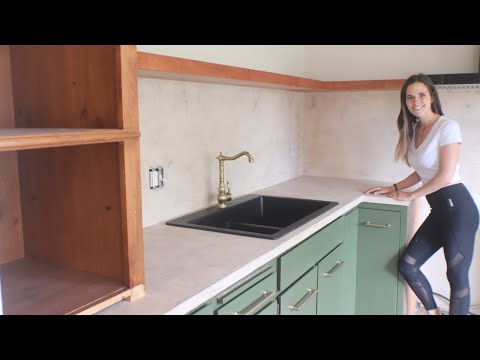
24 hours after I added my final coat of sealant, I could not wait to install my sink and faucet to see it with the new backsplash and countertops. I love the way this turned out! It is the perfect amount of texture and movement. The poly pulled out some of the darker colors and gave it such a beautiful look!


If you love the way this backsplash turned out and you want to see how I created the rest of this kitchen, click here!
