How to Upgrade Your Stairs
The stairs in the lakehouse are very dirty and outdated, today I am going to show you how to upgrade your stairs.
This post may contain affiliate links or sponsored content. For full disclosures and practices, please visit my policy page.
Table of Contents
- Removing the Plastic Runner and Ripping out the Carpet
- Fixing Blemishes in the Wood
- Priming and Painting the Risers on the Stairs
- Railing Refresh
- Cutting the Stairs
- Adding New Treads to the Stairs
- Final Touches
Removing the Plastic Runner and Ripping out the Carpet
The first step in the project is for me to remove the nasty plastic runner that was covering the carpet on the stairs. Once I have removed that, I am ripping the carpet off of the stairs. Ripping up the carpet was SO difficult! There are always a million staples with carpeting on stairs which makes the removal a good workout. I also am pulling off all of the tack strips from the carpet, on the risers and the treads. The staples from the underlayment also have to be knocked out! This whole process has been so tedious.


Fixing Blemishes in the Wood
Once all of the carpeting and everything that comes with it had been removed, there were so many blemishes in the wood beneath. To fix this, I am using high-quality wood filler. I am filling all of the holes from the staples and tack strips and any general blemishes in the wood. Once the wood filler is dry, I am sanding it smooth with my random orbital sander. My goal is to get it as flush to the wood as possible. To remove all of the dust from sanding, I am going over the stairs with a tack cloth.

Priming and Painting the Risers on the Stairs
Once the blemishes in the wood were fixed and the stairs were clean, I am going in with a high-quality primer on the risers. This is for new drywall or hard-to-coat surfaces, I trust it with areas that get a lot of use. Once the primer is dry, I am going in and painting the risers black.

How to Upgrade Your Stairs: Railing Refresh
At this point in the stair upgrade, it is time to remove the railing that is next to the stairs. I want to reuse this railing, so I am going in with black spray paint. This railing has gotten a little bit dinged up over time and during renovations, so the spray paint helped it look as good as new! I did spray paint inside, but if you want to know how I usually spray paint in the winter, I have a blog post on it here!

How to Upgrade Your Stairs: Cutting the Stairs
This part made me VERY nervous! I am going in with my jigsaw to attempt to cut the ends off of each of my stair treads. I am doing this because I am putting in new treads that will match the flooring that is in the hallway above and through the kitchen and living room. Using a jigsaw to try and cut the stair treads in a straight line was a bad choice. I would not recommend this method; it was very difficult. Once I went through with my jigsaw, I went through with my oscillating multitool to cut off what the jigsaw could not reach. If you are doing this I would recommend using a router or circular saw. After completing the cuts on all of the treads, I am painting the side of the stairs black to match the risers.

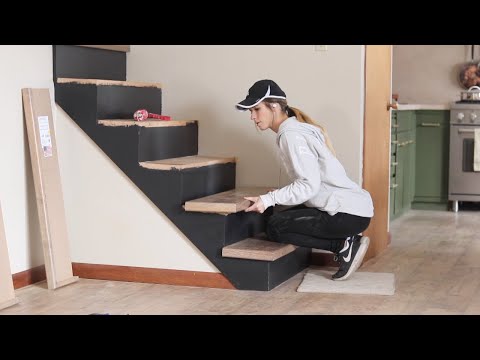
Adding New Treads to the Stairs
When the paint on the side of the stairs has dried, I am checking out my new treads. They have a laminate casing across them! I realized that the front lip is going to extend too far out and could be a tripping hazard. Because of this realization, I have to cut off the front of each tread. I have learned my lesson from cutting the sides of each stair, so I am using my circular saw to cut off the front. The circular saw went much smoother than the jigsaw!
Now that the cutting is done, it is finally time to install my new laminate stair treads. I am starting with a landing strip at the top. I am applying construction adhesive in an S-shaped pattern. Once I have the glue in place, I flip the landing strip over and tape it in place until the glue dries. It is important to not walk on this for at least 12 hours. I am doing the same process on the stair treads that I cut. You do not need to nail down these stair treads and you also do not need underlayment. I am not taping the treads into place, I am just putting pressure on them.
Final Touches
Now that my treads are in place it is time to put my stair railing back in place. My stair railing was made to have carpet go around it, but I think it looks just fine laid on top of the new stair tread. To attach the railing I am predrilling holes through the laminate and then sinking screws down that go into the wood below my laminate tread. Next, I am running a bead of siliconized latex caulk along all of the seams on the top of the treads. This is also going to help hold the treads in place!


The final product of these stairs looks SO GOOD! I revived what was once carpeted, outdated, and disgusting. Now, the stairs are modern and flow so well with the rest of the lakehouse!
