DIY Ultra Thin Kitchen Open Shelving
When I was renovating the kitchen in the lakehouse I decided to remove all of the upper shelving which meant I needed to build something else! I decided to replace the closed cabinet shelves with diy ultra thin kitchen open shelving!
This post may contain affiliate links or sponsored content. For full disclosures and practices, please visit my policy page.
Table of Contents
- Getting Started
- Placing Brackets for the Shelves
- Lumber for the Shelves
- Sanding and Staining the Shelves
- Cutting Spacers
- Shelving Installation
Starting the Building DIY Ultra Thin Kitchen Open Shelving
I started to build my diy ultra-thin kitchen open shelving with a laser level. This ran a laser across the wall to make sure that my shelves would be mounted properly. I measured to where the shelves needed to be. The floors and the ceilings are a little odd, so a laser level was the best option. When I had everything the way I wanted, I ran painter’s tape along the laser line and painted it dark so I would have a permanent level line to base my shelving brackets on.


Placing Brackets for the Shelving
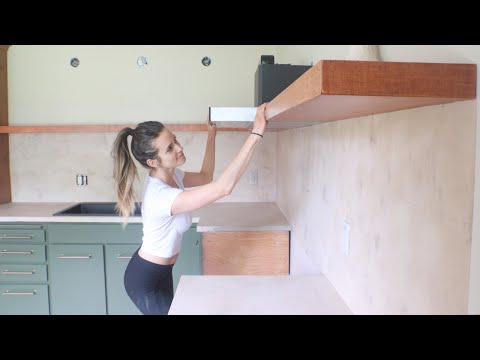
To completely hide the bracket hardware that will hold these shelves up I am lining them up with the level line, then tracing around the bracket and finding the stud with a magnetic stud finder! I am then cutting out the drywall where the bracket will sit. This is so I can recess the bracket behind it right on the stud. These brackets hold 150 pounds, I want this shelf to be very strong. I want it to be ablet to hold plate stacks and other heavy things. I do not want them to sag away from the wall. This is why I staggered the brackets one up, one down. Once the brackets are screwed in place, I am covering the brackets with fiber tape and three coats of mud. Once the brackets are covered I am painting over the mud, you would never guess these brackets are recessed into the wall!


Lumber for the Shelves
Once the brackets are in place I am going to start cutting the lumber. Solid lumber would have been too expensive, so I am using cabinet-grade maple plywood that is 3/4 inch thick. The shelves I am cutting are going to be 11 inches deep. I am going to bevel all of the edges so they meet at a 45-degree angle. This is going to make the wood pieces look like one. It took me a total of 5 hours to cut all of this wood


Finishing the Wood
I am using the work pro sanding set to sand down the wood. I wrap my sanding paper around a sponge to soften the edges of the sanding paper. Before staining, I am using a pre-stain wood conditioner. Once the wood conditioner is in place, I will stain it with a chestnut color. I realized that the chestnut color is too light, so I am mixing it with walnut-colored stain.

Cutting Spacers
The next step in this project is to cut spacers. The brackets are what are going to hold the weight of the shelf, but I need a shelf that is 2 and 1/4 inches tall. These spacers are going to go between the two 3/4 inch sheets of plywood to give me exactly the right depth.

Installing the DIY Ultra Thin Kitchen Open Shelving
Step one of this installation is to nail your spacers into your top board. I am nailing them with one-inch long nails 16 gauge Finnish nails. Then I am going to flip my board onto the brackets and am putting little 3/4 inch wood screws through the bottom of the brackets into the plywood. Next, I put the bottom board against the wood spacers and shot 2-inch brad nails through the spacer into the top board. The little spaces between the two boards are 2 1/2 inches wide and are being filled by pieces of plywood that I cut to fit and are being glued down. On the other side of the kitchen, I am doing a longer shelf. These two meet at a 90-degree angle. I am using brad nails to connect the two shelves. To finish the shelves I am coating them in polyurethane.


If you loved this project and want to see the entire kitchen renovation, read my DIY small kitchen makeover blog post!
