DIY Toy Storage in Crates
I think every household with little children battles toys. Toys that seems endless, and yet your kids don’t even enjoy playing with half of them! Toys that invade your bathroom, kitchen, even your master bedroom. Worst of all, toy storage is nearly impossible. No matter what you do, the toys still end up all over, all the time. I’ve been fighting this battle for two years. Today, the battle is won. This is the war won by my DIY toy storage solution.

STEP 1. Divide & Conquer
The first thing I did was sort through everything for four hours one day. I filled a huge garbage bag full of toys we barely use. I used criteria that placed toys into two basic categories: loved & lasting VS. shiny and passing. Read more about how to sort your toys to keep only ones your kids will ACTUALLY play with.
I felt so great after taking away more than half of the kids’ toys. Why store something you never use? I tried not to get too sentimental about the toys, to just stay practical. The kids haven’t even noticed their toys are gone. They literally did not blink an eye.
Step 2: Build A New Weapon
I found these old black milk crates off Craigslist for $6. There are six of them, they are all identical. I brought them outside and pressure washed the grime, stickiness, and everything else off of them.
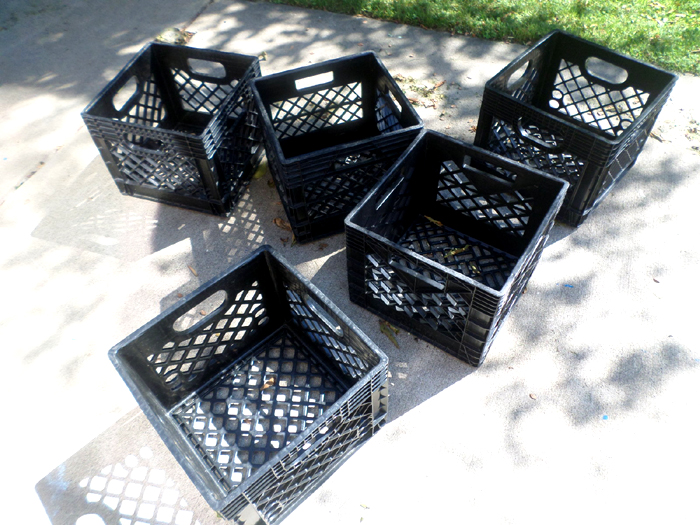
I chose a few fun colors of spray paint (most I already had) and sprayed them.

Next I began to create padded seats for the top that double functioned as lids. I received wood from my dad (he had lots of blandex crap left over). I used fabric scraps and old t-shirts from my seamstress mother. But the one supply I couldn’t resource was the foam for the seats. I search thrift store after garage sale after junk pile for left over foam. Buying foam at the craft store is astronomically expensive. I felt like I ran out of choices. And then…
I bought a toddler bed from IKEA secondhand off Craigslist. The guy delivered the bed and mattress to my home and as I brought it inside, I was curious about the mattress because it didn’t seem as thick or heavy as normal.

I cut open a little piece of the canvas cover….

FOAM! A giant mattress of thick foam!

I decided to use it. Secondhand is the man. Sometimes in a war you have to make sacrifices. I could find another solution for a mattress (like one with actual springs?) and I didn’t see any better solution for finding foam.

Soon I had chopped my foam into equal, perfect sized squares. I even had a large chunk leftover for some future project. I also had to cut the foam squares in half so they weren’t so tall. The foam was twice too thick. I just used a serrated knife.

My three year old took the above picture of me slicing foam. She is the general in this war to organize toys.

Anyway, I finally had all the supplies needed to make my seat lids. I fired up my air compressor staple gun (thanks in-laws for an awesome Christmas gift!) and got to work.

I laid out the fabric (three of them were made using old t-shirts) and cut it to size.

Then I laid the foam (flat side down) on the fabric, followed by the 3/4 inch blandex wood, and used my gun to staple the fabric to the wood.

Lastly, I added skinny wood bars to the bottom that will rest inside the milk crate to make the lid fit tight. These will keep the lid in place when you sit on the crate and provide it with a bit of extra strength. The brad nailer function of the gun made fast work of this step.

I did this process six times. And this, ladies and gentlemen, is how we won the war.

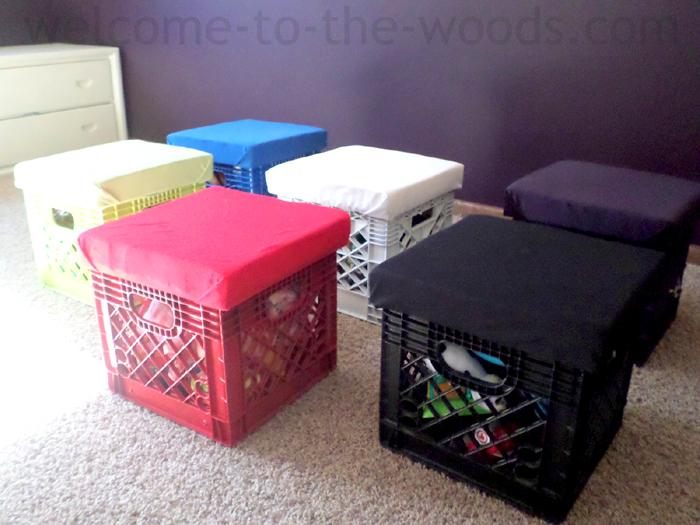

Aren’t they cute!?
And they seriously get the job done. I now have ALL the kids toys stored in them. After putting away so many, this is the quantity we have left and it’s perfect!


I love finding ingenious ways to store things. These crates will be with us a long time. I will take care of them like the war heroes they are.
Step 3: Enjoy the Silence With Your DIY Toy Storage
If you often read my blog, you probably noticed these crates reside in my basement. Well, the silence after the war in our house means the kids are now playing with all their toys downstairs, while I work on dinner and other tasks upstairs. Seriously, it has been one of the quietest weeks home with the kids that I can remember.
Since their toys are now more limited and all have a tidy, designated place to be put away, play time is way more engaging. Now my kids are actually PLAYING with their toys. Clean up took hardly any time and was FUN for the kids to fill a crate so they could put on the lid.

So last but not least, I have to prove my frugality to you. The project costs are as follows:
Six milk crates off Craigslist = $6
Spray paint (bought only plum & lime green, the rest was free from HHW facility) = $8
Fabric (I had to buy clearance plum fabric from JoAnn Fabrics and one t-shirt from a thrift store) = $3.50
Foam = $0 (I’m happy with the price I paid just for the bed. The foam was just a bonus!)
Blandex wood = $0
TOTAL = $17.50
I couldn’t be happier with how my DIY toy storage turned out. I hope you liked it, too! Please let me know what you thought. Did you like my color choices? Please share if you were inspired!
You did a great job! The finished product is amazing and I am inspired to start on my own project! I have a question, how many crates can you paint with one can of spray paint? I will have a large project of about 22 crates for my classroom. I am just curious to how many crates I can spray paint with one can, so I can guesstimate about how many cans I will need.
Thanks,
Lora
Hi Lora, great question! I used approximately 3/4 of a can to spray paint the whole crate inside and out. A lot of the spray paint I used was leftover from my local household hazardous waste facility (check if your area has one!) so I got it for free. If you can, buy Rust-o-leum’s 2X cover paint because it really does cover faster and goes further than other brands.
Thanks for the comment!
Melissa
I absolutely love this idea! I have a son in college. This would be a perfect solution for extra seating in his dorm. Great idea! You’re brilliant!
Aw thanks Angela!
What size did you cut the wood pieces-the one that gets covered with fabric and the small pieces you made to go inside
Hey Monica! Thanks for the question! The wood squares that get covered in fabric are the same size as the outside dimensions of the crate. This piece of wood fits flush on all four sides, covering the top of the crate. The small pieces to go inside do not all measure exactly the same. The important thing is that they are nailed onto the cover about an inch in from the edge so that they hold the cover in place. It’s okay if they extend all the way from one end to the next and it’s also okay if they’re shorter. I guess what I’m getting at is the crate you’re using will dictate the measurements you’re looking for.
Thanks for stopping by!
Melissa
How much fabric would you need per crate seat, roughly? I’m going to make these for Christmas gifts.
Hi Heather! Great question! The size fabric that will fit best is a 24″ by 24″ square.
Melissa
How’s the paint holding up ?
Hi! Thanks for the question. The spray paint is holding up very well on some of the crates, but not so well on some of the others. I’ve found that the ones I used Rust-Oleum 2X spray paint
 that specifically bonds to plastic don’t have any chips of paint off them. The ones I used Krylon, like the red one, is peeling off everywhere. It really matters what brand of paint you use I guess!
This is a great idea for my Grand Children toys and seating for when they watch movies ,my question is
Can the milk crate be covered in Fabric ? for a more playful look.
Thanks
Melissa R
I think the milk crate could easily be covered in fabric! Thanks for your comment Melissa!
Very neat idea! Sure wish I had had milk crates when my sons were small…less mess in their rooms. Thanks for the great post!
Thank you Ruth!
Hi Melissa,
Super idea! And it’s so versatile for a ton of uses! I have some suggestions: I can see them mixed-and-matched, with the colors switched around, just for fun. Or made with a multi-color print to mix around with the different colored boxes, or a variety of prints with similar colors to mix and match. So fun to change them around! On the other hand, if particular toys belong in particular colored boxes, you might want them to match up so they know where to find their special toy without dumping them all out… A person could really take off with your idea! God bless you for sharing!
Love this idea. I have milk-crate-style file boxes and I need foot stools/seats/storage! Thanks for sharing your very good tutorial.
Hi, I would love to include this post in a clever toy storage ideas roundup that I am doing. I would be using one of your pictures with credit, of course, and a link back to this post for instructions. If this is a problem, please let me know.
Hi Claudya,
As long as you link back to my original post, I am fine with you using one of my pictures and including my idea in your roundup.
Thank you for asking!
Melissa
I always seen ideals like this. Was not sure how they did it. Thank you for a more clear instructions on how to do it.
Ingenious! Great use of “I’m not sleeping on that” mattress foam, tee shirts (who doesn’t have a drawer full of them) and a Craigslist bargain! They really are adorable. I loved the extra “wooden frame” that’s sits down inside the crate to keep the lid in place. This extra step is so important to keep the little ones from falling off a slippery stool.
Now you have to create a functional table for all your colorful Storage Stools. Something at the correct height for the stools to be tucked underneath when not in use. The kids would have a ball doing crafts, playing games, having their snacks, etc. at their own multifunctional play table. I’m sure you’ll find bits and pieces on Craigslist….you’ve got a super creative mind. You did such a great job on these storage stools!